Introduction
In this course, we will develop a web application using Node.js and a PostgreSQL database. To interact with the database from our application, we will use the official pg library.
node-postgres (or simply pg) is a collection of Node.js modules designed for working with PostgreSQL. It provides convenient tools for executing SQL queries, managing connections, and handling query results.
The library supports:
- callbacks, promises, and
async/await; - connection pooling;
- prepared statements;
- cursors;
- streaming query results;
- integration with C/C++;
- advanced PostgreSQL type parsing.
Just like PostgreSQL itself, pg offers a rich set of features. Its documentation helps you get started quickly and also includes guides for more advanced or edge-case scenarios. Thanks to this, we’ll be able to leverage the full power of PostgreSQL directly from Node.js code — efficiently, flexibly, and without relying on an ORM.
Basics of the pg Library API
The pg library provides several key interfaces for working with PostgreSQL. In this section, we will cover three main components:
Client— direct connection to the database;Pool— connection pool (the most commonly used option);Result— the data structure returned after executing an SQL query.
1. Client: direct connection
The Client object allows you to establish a single explicit connection to a PostgreSQL database. It is a low-level interface, useful for executing small one-time operations or manually managing transactions.
Example:
import { Client } from "pg";

const client = new Client({
  host: "localhost",
  port: 5432,
  user: "postgres",
  password: "secret",
  database: "mydb",
});

await client.connect();

const res = await client.query("SELECT NOW()");
console.log(res.rows[0]);

await client.end();
Features:
Each connection is manually established using
connect()and closed usingend().Used in scenarios where full control over the connection is required.
The Client object is created using the constructor new Client(config: Config), which accepts the following parameters:
type Config = {
  user?: string, // default process.env.PGUSER || process.env.USER
  password?: string or function, //default process.env.PGPASSWORD
  host?: string, // default process.env.PGHOST
  port?: number, // default process.env.PGPORT
  database?: string, // default process.env.PGDATABASE || user
  connectionString?: string, // e.g. postgres://user:password@host:5432/database
  ssl?: any, // passed directly to node.TLSSocket, supports all tls.connect options
  types?: any, // custom type parsers
  statement_timeout?: number, // number of milliseconds before a statement in query will time out, default is no timeout
  query_timeout?: number, // number of milliseconds before a query call will timeout, default is no timeout
  lock_timeout?: number, // number of milliseconds a query is allowed to be en lock state before it's cancelled due to lock timeout
  application_name?: string, // The name of the application that created this Client instance
  connectionTimeoutMillis?: number, // number of milliseconds to wait for connection, default is no timeout
  idle_in_transaction_session_timeout?: number // number of milliseconds before terminating any session with an open idle transaction, default is no timeout
}
2. Pool: connection pool (recommended approach)
The Pool object manages multiple connections to the database. It is the most efficient and reliable way to connect in real-world web applications.
Example:
import { Pool } from "pg";

const pool = new Pool({
  host: "localhost",
  port: 5432,
  user: "postgres",
  password: "secret",
  database: "mydb",
});

const result = await pool.query("SELECT * FROM users WHERE id = $1", [1]);
console.log(result.rows[0]);
Advantages:
The pool automatically manages connections.
Reuses already established connections.
Suitable for high-load applications.
The connection pool is created using the constructor new Pool(config: Config), which accepts the following parameters:
type Config = {
  // all valid client config options are also valid here
  // in addition here are the pool specific configuration parameters:

  // number of milliseconds to wait before timing out when connecting a new client
  // by default this is 0 which means no timeout
  connectionTimeoutMillis?: number

  // number of milliseconds a client must sit idle in the pool and not be checked out
  // before it is disconnected from the backend and discarded
  // default is 10000 (10 seconds) - set to 0 to disable auto-disconnection of idle clients
  idleTimeoutMillis?: number

  // maximum number of clients the pool should contain
  // by default this is set to 10.
  max?: number

  // Default behavior is the pool will keep clients open & connected to the backend
  // until idleTimeoutMillis expire for each client and node will maintain a ref
  // to the socket on the client, keeping the event loop alive until all clients are closed
  // after being idle or the pool is manually shutdown with `pool.end()`.
  //
  // Setting `allowExitOnIdle: true` in the config will allow the node event loop to exit
  // as soon as all clients in the pool are idle, even if their socket is still open
  // to the postgres server.  This can be handy in scripts & tests
  // where you don't want to wait for your clients to go idle before your process exits.
  allowExitOnIdle?: boolean
}
The pool is initially created empty and will create new clients lazily as they are needed. Every field of the config object is entirely optional. The config passed to the pool is also passed to every client instance within the pool when the pool creates that client.
3. Result: the result of executing an SQL query
The query(...) method returns a result object with the following structure:
{
  rows: Array<any>,         // array of result rows
  rowCount: number,         // number of rows
  command: string,          // type of SQL command (e.g., SELECT, UPDATE)
  fields: Array<FieldInfo>  // information about columns
}
Query example:
import pg from "pg";
const { Pool } = pg;

const pool = new Pool();

const client = await pool.connect();
const result = await client.query({
  rowMode: "array",
  text: "SELECT 1 as one, 2 as two;",
});
console.log(result.fields[0].name); // one
console.log(result.fields[1].name); // two
console.log(result.rows); // [ [ 1, 2 ] ]
await client.end();
Project structure
Create a directory named gophertalk-backend-express. Inside it, create a subdirectory called src, along with the files .env, package.json, and README.md.
Inside the src directory, create the folders listed below and an empty app.js file. Also create __tests__ directory and its subdirectories.
gophertalk-backend-express/
├── src/
│   ├── controllers/       # Handles HTTP requests
│   ├── services/          # Business logic
│   ├── repositories/      # Database operations (SQL queries)
│   ├── routes/            # Route definitions
│   ├── middlewares/       # Common middlewares
│   ├── packages/          # Downloaded packages with dependencies
│   ├── config/            # Project configuration
│   ├── utils/             # Utility functions
│   ├── validators/        # Input data validators
│   └── app.js             # Application entry point
├── __tests__              # unit tests
│   ├── controllers/
│   ├── services/
│   └── repositories/
├── .env                   # Environment variables
├── package.json
└── README.md
Initializing the project and installing dependencies
Place the following content into the package.json file:
{
  "name": "gophertalk-backend-express",
  "version": "0.1.0",
  "type": "module",
  "main": "src/app.js",
  "scripts": {
    "dev": "nodemon src/app.js",
    "test": "node --experimental-vm-modules node_modules/jest/bin/jest.js"
  },
  "dependencies": {
    "dotenv": "file:packages/dotenv-16.4.7.tgz",
    "express": "file:packages/express-4.21.2.tgz",
    "pg": "file:packages/pg-8.14.1.tgz",
    "jsonwebtoken": "file:packages/jsonwebtoken-9.0.2.tgz",
    "bcrypt": "file:packages/bcrypt-5.1.1.tgz",
    "zod": "file:packages/zod-3.24.3.tgz"
  },
  "devDependencies": {
    "nodemon": "file:packages/nodemon-3.1.9.tgz",
    "jest": "file:packages/jest-29.7.0.tgz"
  }
}
The package.json file contains a JSON object with the following fields:
"name": "gophertalk-backend-express"- The name of the project. It usually matches the folder name and is used when publishing the package (if the project is published to npm)."version": "0.1.0"- The project version in SemVer format:major.minor.patch."type": "module"- Specifies that the project uses ECMAScript modules (ESM) instead of CommonJS. This allows usingimport/exportinstead ofrequire."main": "src/app.js"- The main entry point of the application."scripts"– Custom scripts:"dev": "nodemon src/app.js"- Starts the application in development mode with automatic restarts on file changes (usingnodemon)."test": "node --experimental-vm-modules node_modules/jest/bin/jest.js"- Runs tests using Jest.
The--experimental-vm-modulesflag enables support for ESM in Jest.
"dependencies"– Main runtime dependencies. All packages are installed locally via file references (file:packages/...) instead of from the internet. This is useful in offline environments or when using a local package repository."devDependencies"– Development-only dependencies. These are not included in the production build.
Place the following packages into the src/packages folder:
After that, run the following command from the root of the project inside the gophertalk-backend-express directory:
npm installSetting Environment Variables
Using environment variables in a project allows you to separate sensitive and changeable settings (such as database connection parameters) from the main application code. This is important for several reasons.
First, security: credentials like usernames, passwords, host addresses, and database names should not be included in version control (e.g., Git) to avoid leaking sensitive data when publishing code. Environment variables can be stored in a .env file (which should be added to .gitignore) or set directly in the runtime environment (e.g., on a server or in CI/CD pipelines).
Second, flexibility and ease of configuration: you can deploy the application in different environments — locally, on a test server, or in production — without modifying the source code. It's enough to define environment variables specific to each environment.
Third, readability and scalability: configuration values are stored in one place, making them easier to change and document. This is especially important in team development and when working with multiple services and databases.
For development convenience, we use the dotenv package, which can load environment variables from a .env file. An example of such a file is shown below:
PORT=3000
DB_HOST=localhost
DB_PORT=5432
DB_USER=postgres
DB_PASSWORD=postgres
DB_NAME=postgres
ACCESS_TOKEN_EXPIRES=1h
REFRESH_TOKEN_EXPIRES=24h
ACCESS_TOKEN_SECRET=super_secret_access_token_key
REFRESH_TOKEN_SECRET=super_secret_refresh_token_key
You should provide your own values. You’ll need a running PostgreSQL server, a database inside it, and a user account with access to that database.
Do not change the values of the variables ACCESS_TOKEN_EXPIRES, REFRESH_TOKEN_EXPIRES, ACCESS_TOKEN_SECRET and REFRESH_TOKEN_SECRET, they will be needed later.
Configuring the PostgreSQL Connection
Create a file named db.js in the src/config directory. Add the following content.
import pg from "pg";
import dotenv from "dotenv";

dotenv.config();

const { Pool } = pg;

export const pool = new Pool({
  host: process.env.DB_HOST,
  port: process.env.DB_PORT,
  user: process.env.DB_USER,
  password: process.env.DB_PASSWORD,
  database: process.env.DB_NAME,
});
Let's break down what this code does.
Importing libraries
jsimport pg from "pg"; import dotenv from "dotenv";pg– a library for working with PostgreSQL in Node.js.dotenv– a library that loads environment variables from a.envfile intoprocess.env.
Loading environment variables
jsdotenv.config();- Loads variables from the
.envfile into the globalprocess.envobject. - After that, you can use variables like
process.env.DB_HOST.
- Loads variables from the
Creating and exporting the connection pool
jsconst { Pool } = pg; export const pool = new Pool({ host: process.env.DB_HOST, port: process.env.DB_PORT, user: process.env.DB_USER, password: process.env.DB_PASSWORD, database: process.env.DB_NAME, });- A
poolobject is created and exported, which manages multiple connections to the database. - All configuration parameters are loaded from environment variables.
- A
Creating the main application file, starting the app, and testing the database connection
Place the following content into src/app.js
import dotenv from "dotenv";
import express from "express";
import { pool } from "./db/index.js";

dotenv.config();

const app = express();
const PORT = process.env.PORT || 3000;

app.use(express.json());

app.get("/api/health-check", async (req, res) => {
  try {
    await pool.query("SELECT 1");
    res.status(200).send("OK");
  } catch (err) {
    res.status(500).send("DB connection failed");
  }
});

app.listen(PORT, () => {
  console.log(`Server is running on port ${PORT}`);
});
This code represents a minimal server built with express that connects to a PostgreSQL database using pg. Let’s break it down:
Importing libraries
jsimport dotenv from "dotenv"; import express from "express"; import { pool } from "./config/db.js";dotenvis used to load environment variables from the.envfile.expressis a framework for building web servers and REST APIs.poolis the imported connection pool for PostgreSQL.
Loading environment variables
jsdotenv.config();It loads variables from the
.envfile into theprocess.envobject.Creating the app and defining the port
jsconst app = express(); const PORT = process.env.PORT || 3000;appis an instance of the Express server.PORTis the port the server will listen on (taken from.envor defaults to 3000).
Connecting middleware
jsapp.use(express.json());This enables Express to automatically parse the body of incoming JSON requests (
req.body).What is middleware
A middleware is a function that is executed during the processing of an HTTP request — between receiving the request and sending the response.
Middleware functions can:
- modify the
req(request) orres(response) object, - terminate the request (
res.send(), etc.), - or pass control to the next middleware using
next().
Middleware is commonly used for:
- logging,
- authentication,
- data validation,
- error handling,
- JSON and form parsing (
express.json(),express.urlencoded()), - and much more.
Let's look at an example:
First, the client request reaches the middleware, which checks whether the user is authorized.
If authorization succeeds (e.g., the token is valid), the middleware passes control to the route handler, which processes the request and sends a response. In that case, the client receives a200 OK.If the user is not authorized (e.g., the token is missing or invalid), the middleware doesn't pass control further and immediately returns a
401 Unauthorizedresponse to indicate that access is denied.- modify the
Route
/api/health-check- This is a technical
GETroute used to check the health of the server and database. - It sends a simple
SELECT 1query to the database. - If the database responds, it returns
200 OK; otherwise,500 DB connection failed.
HTTP status codes
HTTP status codes are divided into five categories, each with a specific purpose. Here are some of them:
🔵 1xx — Informational
Code Description 100 Continue — the server has received the headers and is waiting for the body 101 Switching Protocols — e.g., switching to WebSocket 🟢 2xx — Success
Code Description 200 OK — the request was successful 201 Created — a new resource was successfully created (typically for POST) 204 No Content — request succeeded but there is no response body (e.g., DELETE) 🟡 3xx — Redirection
Code Description 301 Moved Permanently — permanent redirection 302 Found — temporary redirection 304 Not Modified — use the cached version of the resource 🔴 4xx — Client Errors
Code Description 400 Bad Request — malformed request 401 Unauthorized — authentication is required 403 Forbidden — access is denied, even if authenticated 404 Not Found — the requested resource does not exist 409 Conflict — a request conflict, such as trying to create a duplicate 422 Unprocessable Entity — valid syntax but semantically invalid (e.g., failed validation) 🔴 5xx — Server Errors
Code Description 500 Internal Server Error — unexpected server-side error 502 Bad Gateway — invalid response from an upstream server 503 Service Unavailable — server is temporarily down (e.g., overloaded) 504 Gateway Timeout — timeout waiting for a response from another server HTTP Methods
HTTP methods define the type of action the client (such as a browser or frontend app) wants to perform on the server at a given URL. They are the foundation of REST APIs and allow for reading, creating, updating, and deleting resources.
Each method has its own purpose and semantics, and using them correctly helps build logical, safe, and user-friendly APIs.
Method Description Idempotent Safe Common use in REST GET Retrieve data from the server ✅ Yes ✅ Yes Reading resources POST Send new data to the server (create a resource) ❌ No ❌ No Creating resources PUT Fully replace a resource ✅ Yes ❌ No Full update of resources PATCH Partially update a resource ❌ No ❌ No Partial update DELETE Delete a resource ✅ Yes ❌ No Deletion HEAD Same as GET, but returns only headers (useful for cache, availability checks) ✅ Yes ✅ Yes Availability checking OPTIONS Returns the allowed methods for a resource (commonly used for CORS preflight) ✅ Yes ✅ Yes Capability discovery If a method is idempotent, it means that calling it multiple times will produce the same result. For example:
GET /userswill return the same user list every time.DELETE /user/5deletes the user; repeated calls do nothing new if the user is already deleted.POST /usersis not idempotent — each call can create a new user.
A safe HTTP method is one that does not alter the state of the server. It is used only to retrieve information and has no side effects like creating or changing data. For example:
GETis safe because it just reads data.POSTis not safe because it may create or update data.
- This is a technical
Starting the server
jsapp.listen(PORT, () => { console.log(`Server is running on port ${PORT}`); });This starts the server on the specified port and prints a message to the console.
To start the application, run the command:
npm run devIf everything is set up correctly, you will see the following output in the console:
> gophertalk-backend-express@0.1.0 dev
> nodemon src/app.js

[nodemon] 3.1.9
[nodemon] to restart at any time, enter `rs`
[nodemon] watching path(s): *.*
[nodemon] watching extensions: js,mjs,cjs,json
[nodemon] starting `node src/app.js`
Server is running on port 3000
To verify that the database connection is successful, send a GET request to the following address http://localhost:3000/api/health-check
There are several ways to do this:
Using the
curlutilityIn a second terminal (since the app is running in the first one), run:
bashcurl http://localhost:3000/api/health-checkIf the connection is successful, you will see the response
OK. Otherwise, an error will appear in the application console.Using a browser
Open any browser and go to
http://localhost:3000/api/health-check.
The browser will send a GET request. If everything is working correctly, you will see the textOK.Using Postman software — more on this later.
What is Postman?
In the world of modern software development, interaction between various applications through APIs (Application Programming Interfaces) has become an essential part of the process. However, before we can build complex integrations, we need to ensure that our API works correctly and returns the expected results.
This is where Postman comes in — a powerful and intuitive tool designed specifically for API testing and development. Sending HTTP requests, creating tests, organizing requests into collections, working with variables — all of this is just a part of Postman’s functionality that simplifies and enhances the testing process.
Key features and useful functions of Postman:
Sending HTTP requests: Postman allows you to easily create and send various types of HTTP requests such as
GET,POST,PUT,DELETE, and others. You can configure request parameters, send headers, query parameters, and a request body.API testing: Postman allows you to create tests to verify server responses. You can define expected values and conditions to automatically check whether the API returns the correct results.
Collections and environments: Postman allows you to organize requests and tests into collections, which simplifies managing a large number of requests. Collections can also be used to automate tests or run them in a specific order. Environments allow you to switch between different configuration contexts (e.g., development, staging, production).
Working with variables: Postman supports the use of variables, making it easier for testers to manage and reuse data in requests, tests, and environments.
These are just some of the many features Postman offers, but overall, Postman is a convenient tool for working with and testing APIs. It also helps structure and automate testing workflows.
Collections
A collection in Postman is a group of API requests organized together by purpose or project.
For example, a collection might include all requests for a specific API:
GET /usersPOST /loginDELETE /posts/:id
Why use collections:
- Easily organize requests into folders/projects;
- Run multiple requests at once (e.g., for testing);
- Export and share them with teammates.
Environments
An environment in Postman is a set of variables that can be reused across requests.
For example:
| Variable | Dev Value | Prod Value |
|---|---|---|
base_url | http://localhost:3000 | https://api.myapp.com |
auth_token | dev-abc123 | prod-xyz789 |
You can use these variables inside requests:
{{base_url}}/api/users
Authorization: Bearer {{auth_token}}
When switching the environment, Postman will substitute the correct values automatically.
Importing Environment and Collection
Download the Postman environment and collection.
Next, either drag the files into the Postman window or use the menu File -> Import to import the environment and collection.
After import, go to the left-hand menu and open the Environments tab. Select the gophertalk flavours environment. You will see a table of variables:

The api_url variable contains the URL of our server: http://localhost:3000/api.
The access_token and refresh_token variables are used to store the JWT tokens that are issued after login. We’ll come back to them later.
Now go to the Collections tab. Expand the gophertalk flavours collection. It contains three folders:
users– endpoints for working with usersposts– endpoints for working with postsauth– endpoints for authentication

You will implement all these endpoints later. For now, we're interested in the health-check endpoint. Double-click it.
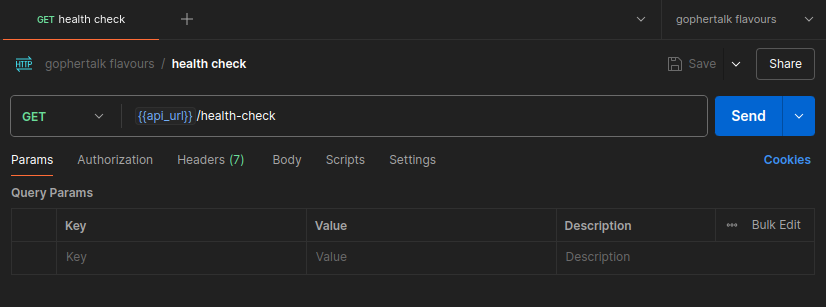
At the top, you will see the HTTP method highlighted in green — in this case, GET.
To the right of the method is the URL. Note that it uses the variable api_url mentioned above. Substituting the variable gives us the final URL: http://localhost:3000/api/health-check.
This is the same URL we configured in our app to check the database connection.
To make the variables work, make sure to select the correct environment in the top right corner above the Send button. In our case, it’s gophertalk flavours.
Make sure your app is running and click Send. The result will be displayed below in the Response window.

Below the URL bar in Postman you will see the following tabs:
Params– URL query parameters for theGETrequestAuthorization– authentication settings for the requestHeaders– request headersBody– request bodyScripts– scripts that can run before or after the requestSettings– request-specific settings
We will work with some of these tabs later.
Conclusion
Building the Express Application Skeleton
We have created a minimal but functional skeleton of a web application using Express.
You’ve learned how to:
- connect essential dependencies (
express,pg,dotenv); - configure environment variables via
.env; - set up a PostgreSQL connection pool;
- implement a basic route (
/api/health-check); - organize your project structure into layers:
controllers,services,repositories,routes,middlewares, and so on.
This foundational structure will serve as the basis for building a full-featured REST API.
Introduction to Postman
We also got acquainted with Postman — an essential tool for testing and debugging APIs.
You’ve learned how to:
- send HTTP requests of various types;
- use collections and environments for better organization;
- work with variables and insert them into your requests;
- test API endpoints without writing frontend code.
Postman greatly accelerates the development process, especially in the early stages when quick verification of routes, authorization, and server logic is crucial.
In the next stage, we’ll begin implementing real endpoints, working with users and authentication — gradually turning our skeleton into a complete API.